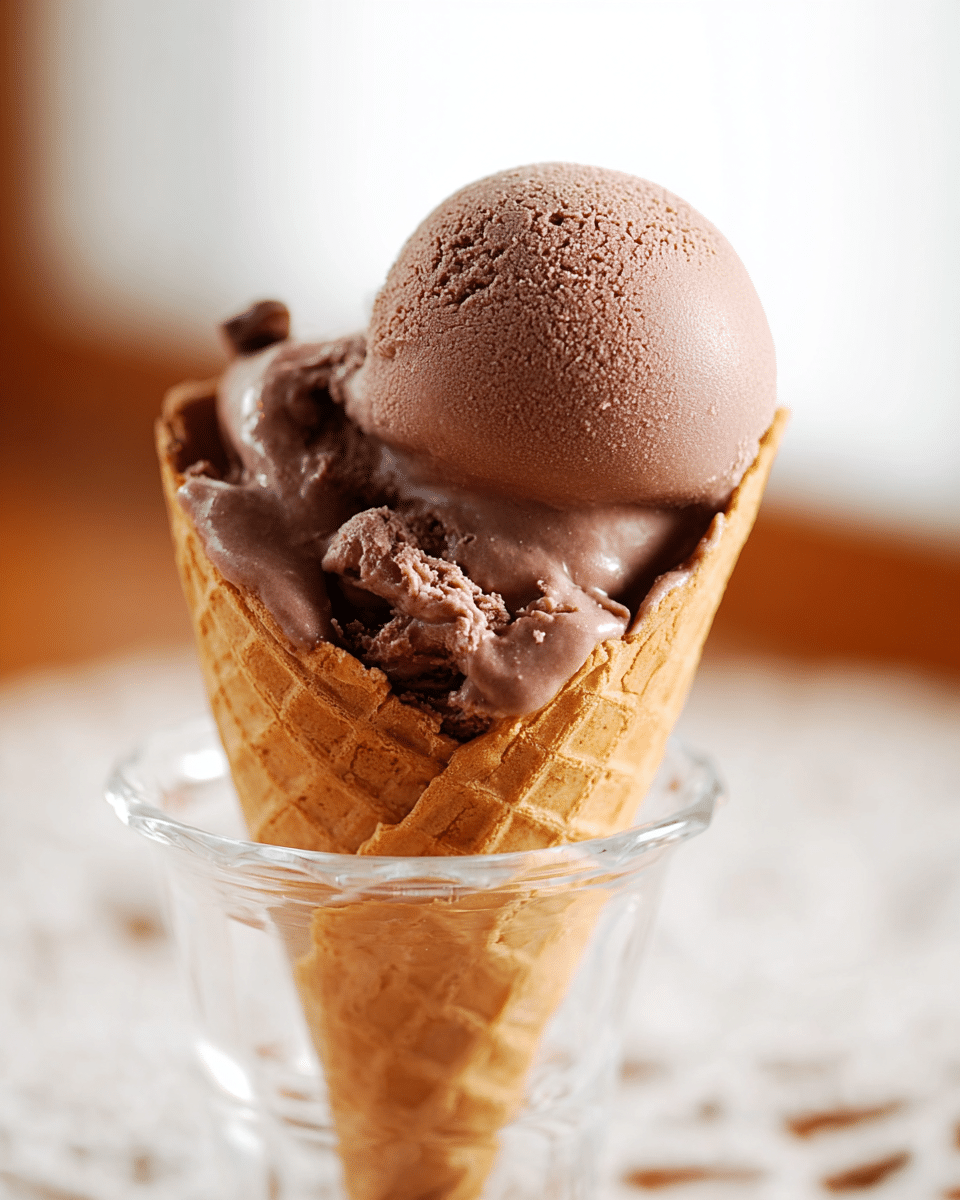
The richness of this homemade Chocolate Ice Cream will transport your tastebuds to a dessert dreamland. Crafted with a double hit of chocolate—smooth dark chocolate and cocoa powder—this treat is indulgent, luscious, and perfect for cooling down on a sunny afternoon.
Its creamy texture is thanks to a slow-cooked custard base, enriched with egg yolks and a splash of vanilla for that classic depth of flavor. Whether served solo or transformed into a sundae masterpiece with whipped cream and hot fudge, this ice cream is the ultimate in homemade luxury.
Full Recipe:
-
4 oz 60% cacao dark chocolate, chopped
-
1/4 cup boiling water
-
1/3 cup unsweetened cocoa powder (natural or Dutch-processed)
-
1/2 cup granulated sugar
-
2 cups whole or low-fat milk
-
2 cups heavy cream
-
Pinch of kosher salt
-
1/4 tsp instant coffee (optional, enhances chocolate flavor)
-
3 large egg yolks, whisked
-
1 tsp vanilla extract
Directions:
-
Melt the chopped chocolate in a double boiler or a metal bowl over simmering water, stirring until smooth.
-
Transfer the melted chocolate to a medium saucepan. Add boiling water, cocoa powder, and half the sugar. Whisk vigorously to remove lumps and combine. Remove from heat.
-
Stir in the milk, 1 cup of cream, remaining sugar, salt, and optional instant coffee. Whisk until fully blended.
-
Heat the mixture over medium-high until it begins to steam.
-
Slowly temper the egg yolks by whisking in a small amount of the hot mixture. Then pour the egg mixture back into the pan and stir.
-
Continue heating on medium until the mixture reaches 170°F and slightly thickens. Remove from heat.
-
Stir in the remaining 1 cup of cold cream to cool it down.
-
Strain through a mesh sieve into a clean bowl to remove any curdled bits.
-
Set the bowl into an ice water bath and stir in vanilla extract. Chill completely (preferably overnight).
-
Churn the base in an ice cream maker according to manufacturer’s directions.
-
Serve immediately for a soft-serve texture or freeze 2–4 hours for a firmer scoop.
Prep Time: 10 minutes | Cooking Time: 25 minutes | Churning Time: 20 minutes | Total Time: 55 minutes
Kcal: ~310 per serving | Servings: 8
Why Homemade Chocolate Ice Cream Is Worth It
Chocolate ice cream is a classic dessert loved across generations and cultures. While it’s easy to grab a tub from the freezer aisle, making it from scratch offers something entirely different—depth, richness, and an unbeatable freshness that can’t be replicated by mass-produced brands. Homemade chocolate ice cream is not just a dessert; it’s a full-on culinary experience that taps into indulgence, creativity, and comfort all at once.
This specific chocolate ice cream recipe is a standout because it uses two forms of chocolate—60% cacao dark chocolate and unsweetened cocoa powder—which together deliver a luxurious, multi-layered chocolate profile. By preparing it at home, you get to control the quality of ingredients, the intensity of flavor, and even tailor the sweetness or creaminess to your preference. For those passionate about food, ice cream like this is not just a treat—it’s a statement of craftsmanship.
The Art of Flavor Layering in Chocolate Ice Cream
Flavor layering is what separates good ice cream from truly spectacular ice cream. This recipe achieves its richness by combining solid chocolate with cocoa powder, allowing both the fat and the dry solids from the cocoa bean to play their part. Solid chocolate gives a creamy, buttery base that melts smoothly on the tongue, while cocoa powder injects a sharper, deeper flavor that lingers longer.
The addition of a pinch of salt and instant coffee (optional) might seem subtle, but these small tweaks significantly enhance the final flavor. Salt balances sweetness and sharpens chocolate’s bitter undertones. Coffee acts as a flavor amplifier, making the chocolate even more pronounced. You may not taste the coffee directly, but you will notice a more vibrant chocolate flavor—this is the magic of proper flavor layering.
Texture: The Silent Hero of Great Ice Cream
Creamy, smooth, luscious texture is arguably as important as flavor. This chocolate ice cream is custard-based, meaning it’s made using egg yolks, which add richness and structure. While some modern recipes skip eggs, using yolks creates a silkier mouthfeel and helps prevent the formation of unpleasant ice crystals when freezing.
Another reason this ice cream’s texture excels is the use of both milk and cream. Milk provides fluidity and helps keep the ice cream light, while cream contributes the high fat content needed for that unmistakable richness. This balance prevents the ice cream from becoming too dense or too icy.
Additionally, the proper tempering of egg yolks and gradual heating of the base to 170°F ensures the mixture is thickened to the perfect consistency without curdling. The straining step that follows is critical—it removes any cooked egg bits and results in a flawlessly smooth base.
The Role of Chilling and Churning
Once the base is cooked, it’s essential to chill it thoroughly before churning. This step isn’t just about temperature—it allows the flavors to mature and meld together. The cooling process, ideally done overnight in the fridge, also results in better incorporation of air during churning, which directly affects the texture of the final product.
Churning is where the magic happens. As the ice cream base rotates inside the maker, it begins to freeze while simultaneously incorporating air. This aeration process is called overrun, and it’s what keeps ice cream from becoming a solid frozen block. The better the churning process, the creamier the final result.
This recipe works beautifully in both compressor and freezer bowl-style ice cream makers. While you can eat the ice cream right after churning for a soft-serve style treat, freezing it for a couple more hours firms it up for traditional scooping.
Ways to Customize Your Chocolate Ice Cream
One of the joys of homemade ice cream is how customizable it is. Here are a few ideas to put your own spin on this chocolate delight:
-
Add Mix-ins: Once the churning is complete, you can fold in chocolate chips, fudge swirls, crushed cookies, or chopped nuts.
-
Infuse Flavors: During the cooking phase, steep ingredients like cinnamon sticks, chili flakes, or mint leaves in the warm milk mixture for a gourmet twist.
-
Make it Boozy: A splash of liqueur like Kahlua or Bailey’s not only adds flavor but also lowers the freezing point, resulting in softer texture.
-
Turn it into a Sundae: Serve with hot fudge, whipped cream, toasted almonds, and a cherry on top for the ultimate chocolate sundae experience.
Perfect Pairings for Chocolate Ice Cream
Chocolate ice cream can stand on its own, but it’s also a great team player when paired with other foods:
-
Fresh Berries: The tartness of raspberries or strawberries complements the sweetness of the ice cream.
-
Salted Caramel Sauce: A drizzle brings contrast that enhances both flavors.
-
Espresso: A scoop of chocolate ice cream submerged in a hot espresso shot becomes a decadent affogato.
-
Waffles or Brownies: Use as a topping or sandwich between for an unforgettable dessert.
Storage and Shelf Life
Homemade chocolate ice cream should be stored in an airtight container in the coldest part of your freezer. Covering the surface with parchment paper or plastic wrap before sealing helps prevent ice crystals from forming. For best flavor and texture, enjoy it within 2 to 3 weeks.
Keep in mind, since homemade ice cream lacks commercial stabilizers, it may harden more than store-bought versions. Simply let it sit at room temperature for a few minutes before scooping.
Healthier Alternatives and Diet-Friendly Options
For those who are health-conscious or follow specific diets, modifications can be made without sacrificing too much of the original richness:
-
Dairy-Free Version: Substitute coconut milk and coconut cream for the milk and heavy cream. Use dairy-free dark chocolate and a plant-based thickener like arrowroot.
-
Low-Sugar Option: Replace sugar with a sugar substitute like erythritol or stevia. Note that this may slightly affect texture and freezing properties.
-
Egg-Free Version: You can eliminate the yolks entirely and opt for a Philadelphia-style base, though the resulting ice cream will be less rich and creamy.
Why This Recipe Stands Out
What makes this chocolate ice cream recipe stand out from others is its balance between simplicity and gourmet quality. You don’t need exotic ingredients or complex techniques to achieve a result that tastes like it came from a professional ice cream shop. The careful use of flavor enhancers like vanilla, coffee, and salt, combined with proper cooking and churning methods, results in an ice cream that’s not only indulgent but reliably good every time.
This is a recipe that’s both beginner-friendly and endlessly adaptable for more advanced cooks. It’s perfect for birthdays, summer parties, romantic dinners, or just a quiet night in when you need a spoonful of joy.
Conclusion
There’s something deeply satisfying about making chocolate ice cream from scratch. It connects you to the food you’re eating in a way no store-bought version can. With just a little planning and effort, you’re rewarded with a dessert that’s full of bold flavor, silky texture, and sweet satisfaction.
Whether you’re an experienced home cook or trying your hand at ice cream for the first time, this recipe offers a foolproof way to master one of the most beloved desserts of all time. Not only will your tastebuds thank you, but so will anyone lucky enough to get a scoop from your kitchen.
