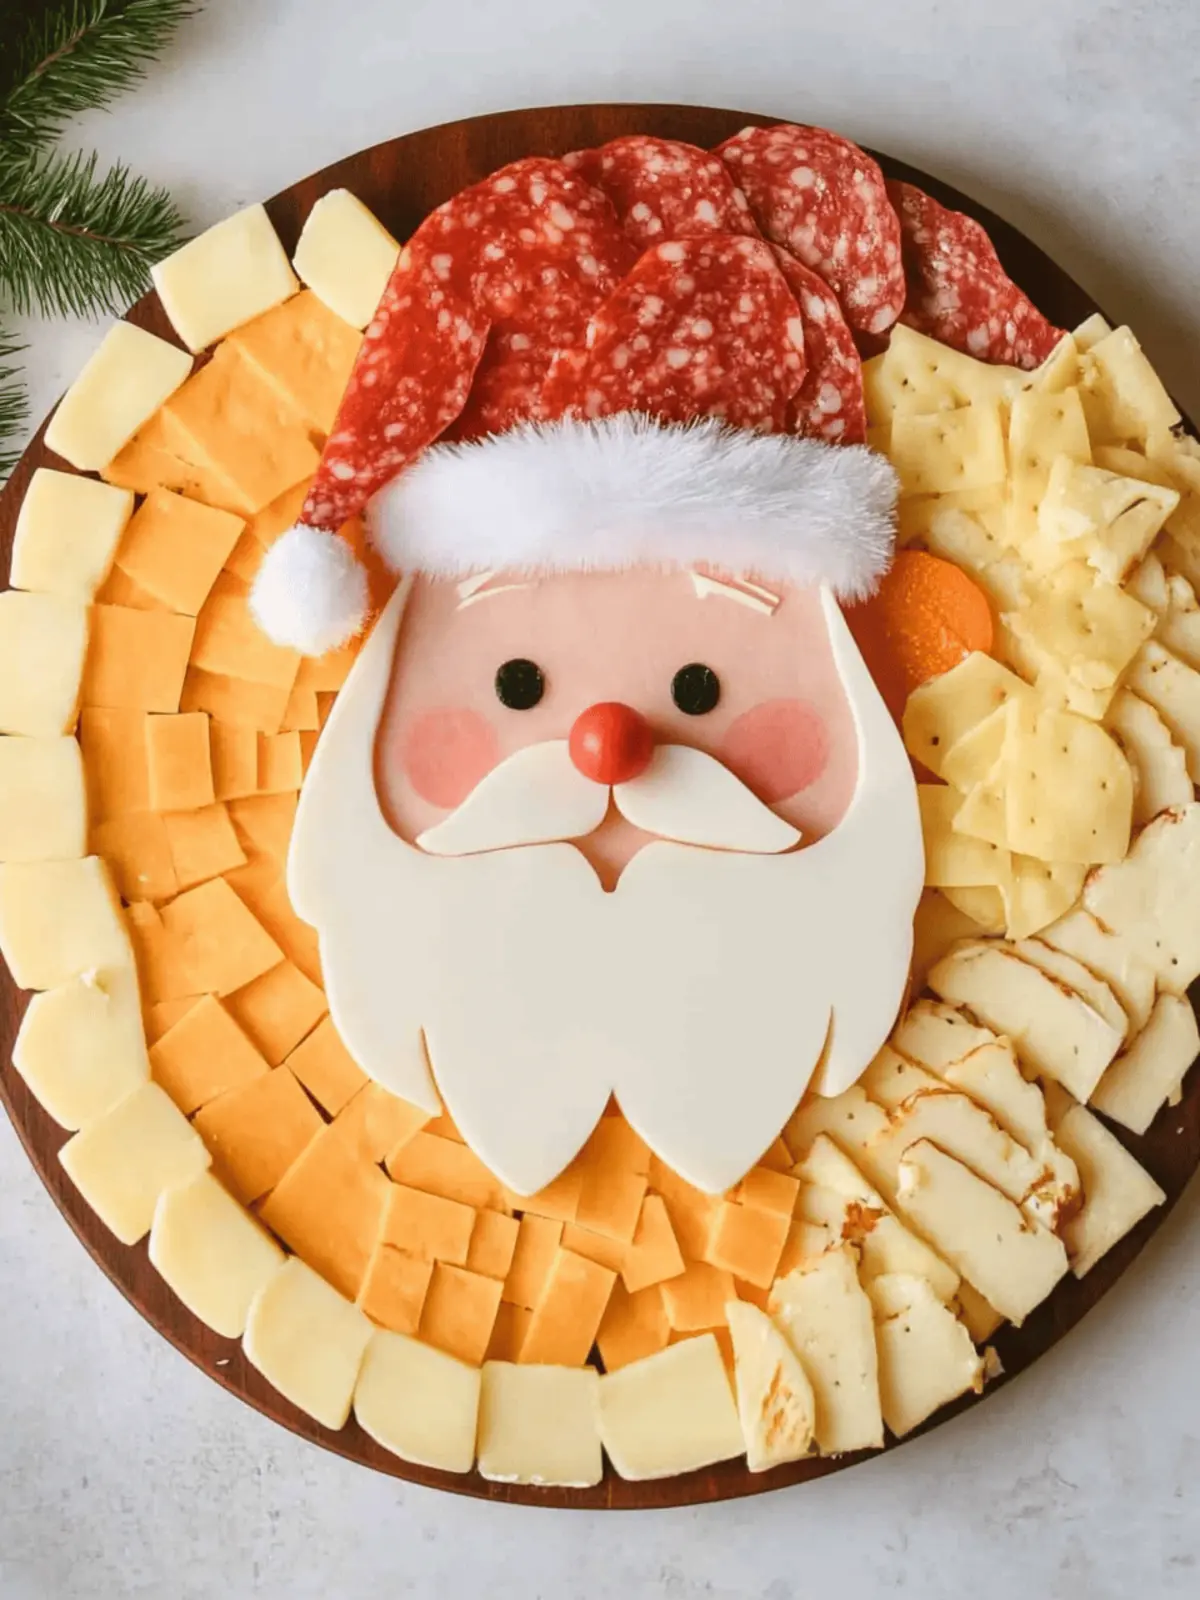
When the holiday season rolls around, there’s something enchanting about gathering everyone in the kitchen to create festive treats. This Easy Santa Christmas Cheese Board is not just a delicious snacking option; it’s an artistic project that invites kids to help craft a cheerful masterpiece that’s perfect for holiday gatherings! The combination of vibrant cheeses, savory pepperoni, and playful veggies makes this board a feast for both the eyes and the taste buds.
Not only is it a breeze to assemble with minimal prep time, but its customizable nature means you can swap in your family’s favorite ingredients. Whether it’s an afternoon snack or a playful addition to your holiday spread, this delightful cheese board is destined to become a beloved tradition. Join me in transforming ordinary snacks into extraordinary holiday cheer with this fun and easy recipe!
Why will you love this Easy Santa Christmas Cheese Board?
Delightful Creativity: This cheese board allows kids to unleash their creativity, making holiday cooking a fun and innovative activity.
Vibrant Presentation: With colorful cheese and toppings, it’s a feast for the eyes that will impress guests.
Quick Assembly: Minimal prep time means more holiday cheer and less kitchen stress!
Customizable Fun: You can easily tailor ingredients to your family’s preferences, making it versatile and personal.
Kid-Friendly: Perfect for little hands to participate, promoting bonding over delicious food.
Crowd-Pleasing Appeal: Everyone will adore this festive snack, blending flavors and textures that cater to all ages!
Easy Santa Christmas Cheese Board Ingredients
For the Base
• Different Colored Cheeses – They provide a colorful foundation; substitutes include any cheese variety you prefer.
• Crackers – Use as a crunchy base layer; try whole grain or gluten-free options for variety.
For Santa’s Features
• Pepperoni – Essential for Santa’s hat and facial features; alternatively, sliced deli meats or salami can be used.
• Olives – Ideal for Santa’s eyes; any small round vegetable can work in their place.
For Additional Fun
• Grape or Cherry Tomatoes – Perfect for the nose; you can swap with small round fruits like berries if desired.
• Vegetable Sticks – Include celery or carrot sticks for extra crunch and color; these add healthy options alongside your cheese board.
This Easy Santa Christmas Cheese Board transforms your holiday snacks into a charming festive display perfect for family gatherings!
How to Make Easy Santa Christmas Cheese Board
- Select a Plate: Choose a round plate according to the number of servings you desire; a larger plate allows for more festive creativity.
- Layer Cheese: Lay one color of cheese squares on the plate to cover most of the surface, leaving the edges clear for an appealing border.
- Arrange Pepperoni: Place pepperoni slices on top to form Santa’s iconic hat, don’t forget to include two slices for rosy cheeks.
- Add Hat Brim: Use a different colored cheese slice to create the brim of Santa’s hat, adding depth and fun to his appearance.
- Create Santa’s Eyes: Position two olives for the eyes and cut contrasting cheese into shapes for eyebrows, enhancing Santa’s facial features.
- Make the Nose: Halve a cherry or grape tomato to use as Santa’s nose, bringing a splash of vibrant color to his face!
- Trim for Features: Cut cheese into shapes for the mustache and eyebrows; you can also trim the pepperoni to craft a cheerful smiling mouth.
- Finish the Beard: Finally, use square cheese slices that match the color of the hat brim to form Santa’s fluffy beard, ensuring a delightful finish.
Optional: Serve with festive crackers for added crunch and flavor.
Exact quantities are listed in the recipe card below.
What to Serve with Easy Santa Christmas Cheese Board?
The holiday season calls for delightful accompaniments that elevate your festive cheese board experience!
- Crunchy Breadsticks: These delightful snacks add a satisfying crunch and provide a sturdy base for stacking your tasty cheese and pepperoni creations. A perfect nibble to complement the board’s flavors.
- Fruit Platter: A mix of seasonal fruits, like sliced apples and pears, offers a refreshing contrast to the savory elements. The natural sweetness brightens each bite!
- Spiced Nuts: Offer some roasted almonds or pecans for a warm, nutty crunch that’ll delight your guests while enhancing the festive mood. Their richness pairs beautifully with the creamy cheeses.
- Sparkling Juice: Opt for a non-alcoholic sparkling apple cider or berry-infused beverage to keep the celebration merry and bright. The fizz adds a fun touch to your festive gathering.
- Herbed Crackers: Choose assorted artisan crackers infused with herbs for added flavor depth; they pair perfectly with the variety of cheeses. Their unique taste enhances the whole experience.
- Kid-Friendly Cookies: Finish off the festive meal with fun, holiday-themed sugar cookies. They add a sweet treat touch and bring excitement to your holiday table.
Enjoy curating your holiday snacking experience with these delightful pairings!
Storage Tips for Easy Santa Christmas Cheese Board
- Room Temperature: For optimal freshness and flavor, enjoy the cheese board within 2 hours of assembly if left out.
- Fridge: Store any leftovers in an airtight container for up to 3 days, keeping the ingredients safe while maintaining their deliciousness.
- Freezer: Avoid freezing the Easy Santa Christmas Cheese Board, as the texture of cheese and vegetables may change, affecting the delightful presentation.
- Reheating: If you want a warm cheese snack later, simply heat individual components gently in the microwave for a few seconds, avoiding overdoing it.
Expert Tips for the Best Easy Santa Christmas Cheese Board
- Color Contrast: Ensure you include different colored cheeses for Santa’s face and beard; this enhances the visual appeal and makes it more festive.
- Involve the Kids: Let children participate in assembling the cheese board, turning it into a fun family activity that sparks creativity and bonding.
- Pre-Cut Ingredients: For quicker assembly, pre-cut cheese and toppings ahead of time; this helps avoid last-minute stress during holiday preparations.
- Use Versatile Substitutes: Don’t hesitate to swap out ingredients for the Easy Santa Christmas Cheese Board; personalization keeps things exciting and caters to everyone’s tastes.
- Stay Fresh: Assemble the cheese board shortly before serving; while prepped ingredients can last a few hours, freshness truly shines when it’s newly created.
- Taste Textures: Balance the creamy cheese and savory pepperoni with crunchy vegetables and crackers; this variety enhances the snacking experience.
Easy Santa Christmas Cheese Board Variations
Feel free to unleash your culinary creativity and personalize this recipe for a festive twist everyone will love!
- Cheese Swap: Replace the cheeses with your favorites, like creamy goat cheese or sharp cheddar, to cater to different palates.
- Cracker Variety: Try different types of crackers, such as rosemary-infused or seed-based options, to add a unique crunch.
- Veggie Boost: Add colorful veggies like bell pepper strips or radish slices to brighten the board and bring extra flavor.
- Sweet Touch: Incorporate dried fruits like apricots or figs for a surprising sweet element alongside the savory ingredients.
- Spicy Kick: Use spicy salami instead of pepperoni for those who enjoy a bit of heat in their festive snacks.
- Nutty Addition: Sprinkle on some mixed nuts or add a few nut butter blobs for delightful textures that contrast with the cheese.
- Herbal Infusion: Garnish with fresh herbs like parsley or basil for a burst of color and a refreshing flavor lift.
- Plant-Based Option: Go vegan by utilizing cashew or almond cheeses, and swap pepperoni for marinated tofu or roasted chickpeas.
Make Ahead Options
This Easy Santa Christmas Cheese Board is perfect for busy home cooks looking to save time during the festive season! You can pre-cut the various cheeses, pepperoni, and veggies up to 24 hours in advance, storing them in airtight containers in the refrigerator to maintain freshness and prevent any drying out. When it’s time to serve, simply arrange the prepped components on a round plate following the assembly instructions. This way, you’ll have a delightful cheese board ready with minimal effort, allowing you to enjoy the holiday festivities without the stress of last-minute prep! Just remember to add the vibrant cherry or grape tomato as Santa’s nose right before serving for a fresh touch.
Easy Santa Christmas Cheese Board Recipe FAQs
What type of cheese should I use for the Easy Santa Christmas Cheese Board?
Absolutely! The charm of this cheese board lies in different colored cheeses, which create a vibrant display. You can use any cheese variety your family enjoys, such as cheddar, mozzarella, or gouda. I often recommend combining at least two types for a striking visual effect and a delightful taste!
How should I store leftovers from the cheese board?
For_best freshness, store any leftovers in an airtight container in the fridge. They should be good for up to 3 days. Just make sure they’re well-wrapped to avoid drying out. If you notice any dark spots or unusual smells, it’s best to discard them.
Can I freeze the Easy Santa Christmas Cheese Board?
I do not recommend freezing this cheese board, as it can change the texture of the cheese and vegetables, resulting in a less appealing meal. However, if you do wish to freeze individual components, like cheese, wrap them tightly in plastic wrap and store them in a freezer-safe bag for up to 3 months. To thaw, place in the fridge overnight and use for cooking or nibbling.
How can I make this recipe kid-friendly for younger children?
Very! Engage your little ones by letting them choose toppings and placing them on the board. For safety, supervise them while using any cutting tools or small foods. Additionally, opt for softer cheeses and larger veggie pieces to prevent choking hazards—everyone can have fun while keeping it safe!
What if my kids have allergies, can I still make this cheese board?
Definitely! This recipe is highly customizable, making it easy to adapt for different dietary needs. For instance, if your kids are dairy-free, you can use plant-based cheese alternatives. Similarly, if there are any meat restrictions, consider substituting with hummus or roasted veggies atop the cheese instead. Just be sure to read all labels for allergens.
How far in advance can I prep the ingredients?
I often prep the cheese and toppings a few hours before assembly. Cut the cheese and veggies and store them in airtight containers in the fridge to maintain freshness. This allows for a quick and stress-free assembly right before serving, ensuring that the cheese board looks its best for your holiday gathering.

Create a Festive Easy Santa Christmas Cheese Board with Kids
Ingredients
Equipment
Method
- Select a plate according to the number of servings you desire; a larger plate allows for more festive creativity.
- Lay one color of cheese squares on the plate to cover most of the surface, leaving the edges clear for an appealing border.
- Place pepperoni slices on top to form Santa's iconic hat, including two slices for rosy cheeks.
- Use a different colored cheese slice to create the brim of Santa's hat.
- Position two olives for Santa's eyes and cut contrasting cheese into shapes for eyebrows.
- Halve a cherry or grape tomato to use as Santa's nose.
- Cut cheese into shapes for the mustache and eyebrows; trim the pepperoni for a cheerful smiling mouth.
- Use square cheese slices that match the color of the hat brim to form Santa's fluffy beard.
