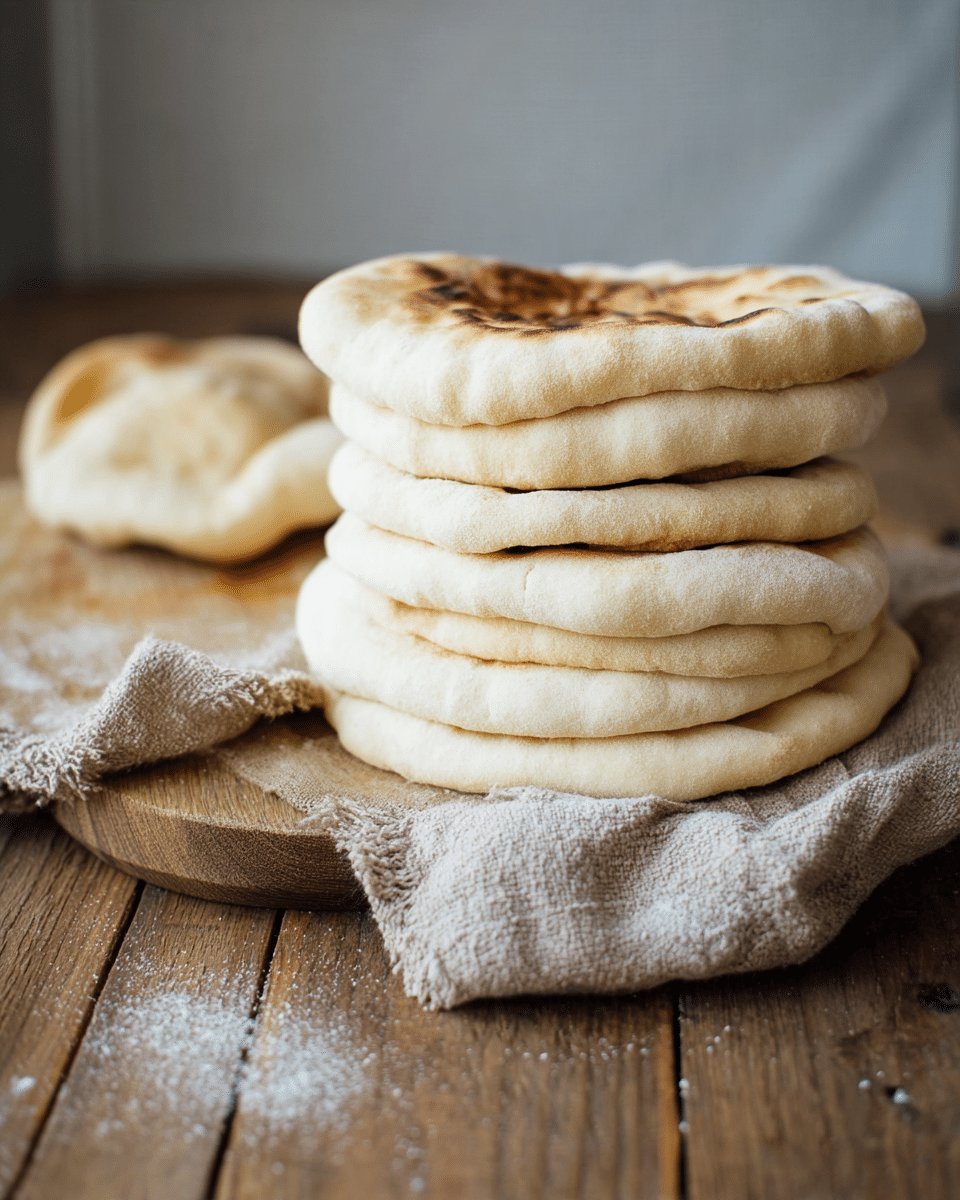
There’s nothing quite like biting into warm, homemade pita bread straight from your skillet. It’s soft, fluffy, and forms the perfect pocket, making it ideal for stuffing with your favorite fillings or simply enjoying with hummus or olive oil. Unlike many store-bought versions, this pita is free from preservatives and full of fresh, yeasty aroma.
What makes this recipe extra special is how easy and fast it is to prepare. With just six simple ingredients and a quick rise, you’ll have bakery-quality pita bread on your table in under 30 minutes. Whether you’re serving a Mediterranean feast or just need a quick side for your meal, this bread elevates every bite with its pillowy texture and versatile flavor.
Full Recipe:
-
2¼ teaspoons active dry yeast (1 packet)
-
1 teaspoon granulated sugar
-
¾ cup warm water (about 110°F)
-
2 cups all-purpose flour
-
1 teaspoon salt
-
1 tablespoon olive oil
Directions:
-
In a large mixing bowl, dissolve yeast and sugar in warm water. Let sit for 5–10 minutes until frothy.
-
Add flour, salt, and olive oil. Mix until a dough forms. Knead the dough for 5–7 minutes until smooth.
-
Place dough in a lightly oiled bowl, cover with a damp towel, and let rise in a warm area for 1 hour or until doubled in size.
-
Punch down the dough and divide it into 6 equal pieces. Roll each into a ball, then roll each ball out into a ¼-inch thick circle.
-
Heat a cast-iron skillet or non-stick pan over medium-high heat.
-
Place one dough circle in the pan and cook for 2 minutes, until bubbles form and the bottom has brown spots. Flip and cook another 1–2 minutes until puffed.
-
Repeat with remaining dough. Serve warm or store in an airtight container.
Prep Time: 15 minutes | Cooking Time: 15 minutes | Total Time: 30 minutes
Kcal: 160 kcal | Servings: 6 pitas
The Magic of Homemade Pita Bread
Few culinary experiences match the joy of tearing into freshly made pita bread — warm, soft, and slightly puffed with a tender chew and signature pocket in the center. This Middle Eastern staple has gained global appeal, not just because it’s delicious, but because of how incredibly versatile and simple it is to make at home. In a world filled with convenience foods and prepackaged bread, there’s something wonderfully grounding about creating pita from scratch. It connects you to age-old traditions and delivers flavors no store-bought version can replicate.
Homemade pita bread is more than just a flatbread — it’s a canvas for culinary creativity. Whether used for scooping up creamy dips like hummus or baba ghanoush, wrapping up gyro fillings, or serving alongside stews and grilled meats, pita bread always delivers. And once you realize how easy and rewarding it is to make at home, you might never go back to store-bought again.
A Brief History of Pita Bread
Pita bread is one of the oldest types of bread known to humankind. Its origins trace back thousands of years to the Middle East, particularly around modern-day Egypt, Israel, and surrounding regions. Ancient civilizations such as the Egyptians, Greeks, and Mesopotamians used flatbreads in their diets long before the invention of the modern oven.
What makes pita unique is its puffed-up interior, which forms a pocket — a result of steam created during the high-heat cooking process. Historically, pita was baked on hot stones or clay ovens, giving it its characteristic texture. Today, even in a simple skillet or cast-iron pan, you can replicate that traditional technique with fantastic results.
Why Make Pita Bread at Home?
There are many reasons to make pita bread at home, beyond the incredible taste. First, homemade pita is far fresher than anything you’ll find at the store. Without preservatives and unnecessary additives, it’s cleaner and healthier. Plus, you control the ingredients — from the type of flour to the oil and salt content — making it easy to tailor to dietary needs or preferences.
Another reason is the texture. Fresh pita is soft, tender, and warm, with a gentle chew and perfectly formed pocket. Store-bought pita often lacks that ideal balance between flexibility and structure, sometimes arriving dry or rubbery. At home, the steam created during high-temperature cooking puffs up the dough, separating the layers and forming that iconic pocket.
Finally, there’s the sheer satisfaction. Making bread from scratch, even a quick-cooking one like pita, is incredibly fulfilling. The dough is simple to work with, forgiving, and quick to rise. Within an hour, you can go from flour and water to warm, pocketed bread on your plate.
Versatility and Serving Suggestions
One of pita bread’s greatest strengths is its versatility. It complements countless cuisines and dishes, making it a staple in many homes around the world. The most iconic use is probably the pita sandwich or wrap — whether it’s filled with grilled chicken, falafel, lamb gyros, or crispy vegetables, the pocket is perfectly suited for holding fillings without falling apart.
But beyond wraps, pita serves well as a side or even a main event. Cut it into triangles and toast or bake them for homemade pita chips, ideal for dipping into hummus, tzatziki, or spicy bean dips. You can also brush the flatbreads with olive oil and garlic for a quick pita garlic bread, use them as a base for mini pizzas, or tear them into soups and salads for added texture.
In Middle Eastern cuisine, pita bread is often used as an edible utensil, scooping up curries, stews, and dips. It’s equally at home on Mediterranean mezze platters, Indian-style wraps, or as a carrier for Korean-style beef and slaws. There are very few ingredients or flavors that don’t pair well with this bread’s subtle profile and soft texture.
What Makes a Great Pita?
The quality of your pita depends on a few key factors. First is the dough: it should be soft, elastic, and not too dry. Kneading is important to develop gluten, which gives the bread structure and allows it to puff during cooking. Letting the dough rise until doubled ensures a light and airy crumb.
Another important aspect is the heat. Pita requires high temperatures to cook properly and puff. This is what forms the internal steam that separates the layers and creates the famous pocket. A skillet on the stove or a pizza stone in a very hot oven will both do the trick.
Rolling the dough evenly is essential, too. If the circles are too thin or thick, or uneven in thickness, they may not puff properly. You want to aim for about ¼-inch thickness and make sure each round is evenly shaped for the best results.
Tips for Perfect Homemade Pita Bread
-
Preheat your pan or oven well. High heat is crucial to get the puff. Don’t rush this step — the hotter your cooking surface, the better the puff.
-
Roll out your dough evenly. Uneven dough leads to uneven cooking and may prevent pocket formation.
-
Don’t over-flour the surface. Excess flour can burn in the pan or create a crust that inhibits puffing.
-
Cover the dough while it rests. Dough can dry out quickly. Keep it covered to maintain moisture and softness.
-
Cook one at a time. Give each pita space and attention. You’ll get better control and consistency.
Storage and Reheating
Pita bread is best enjoyed warm and fresh, but it stores well for later use. After cooking, let the pitas cool completely before storing. Place them in an airtight container or zip-top bag. They’ll keep at room temperature for up to 2 days or in the refrigerator for 4–5 days.
To freeze, separate each pita with parchment paper and store in a freezer bag. They’ll keep well for up to 2 months. Reheat frozen or refrigerated pitas in a toaster oven, dry skillet, or microwave wrapped in a damp paper towel to restore their softness.
Common Mistakes and How to Avoid Them
Many first-time pita makers worry about whether their bread will puff. While not every single pita will puff perfectly, a few simple tips can increase your success rate:
-
Dough too dry or under-kneaded: Moist, well-kneaded dough is key. Add small amounts of water if your dough is stiff, and knead it until it’s smooth and elastic.
-
Surface not hot enough: Make sure your pan is preheated properly. The burst of heat is what creates the steam for the pocket.
-
Dough rolled too thin: Extremely thin dough won’t puff properly. Stick to about ¼-inch thickness.
-
Inconsistent rolling or resting: If the dough isn’t rolled evenly or rested properly before cooking, it may stay flat.
Even if some pitas don’t puff into full pockets, they’ll still be delicious — soft, chewy, and perfect for dipping.
Conclusion: A Simple Bread with Rich Rewards
Homemade pita bread is one of those recipes that checks every box: it’s quick, simple, incredibly satisfying, and deeply rewarding. Whether you’re a novice baker or a seasoned home cook, this bread gives you bakery-quality results with minimal effort. It’s versatile enough to work as a sandwich wrap, side bread, snack chip, or edible utensil, and pairs beautifully with a world of flavors.
What sets this recipe apart is its reliability. With just a few pantry staples and 30 minutes of your time, you’ll be holding warm, puffed pita in your hands — no fancy equipment, no complicated techniques. Once you try homemade, you’ll wonder why you ever settled for store-bought.


